
Thursday, October 20, 2011
Friday, October 7, 2011
CORK DOORMAT

Here is how I make a cork doormat using wire and cork. You can make one too with a bunch of corks, some wire, wire cutters Pliers and some metal grommets or eyelets!

Step One : Collect corks. 286 corks total for this 20x30 doormat
I have a huge collection of corks. I ask for corks at wineries when we go wine tasting and I have several friends who save their corks. Most wineries will save them and donate them for free. Since I have started making doormats I have used thousands of corks and no I didn't drink all that wine.... and Yes that is the number one question asked...lol
Step Two: lay out a pattern. I like to use cookie sheets to lay out a pattern. 12 corks in every row except for row one and row 24 which each have only 11 single holed corks in them. If you want to make a border using a cork you have a lot of this is the time to lay it out in a pattern you like.

You can use a hand drill or a drill press. My drill bit size of choice is 9/64
Step Three: Drill holes.
You need to drill one hole in the middle of 22 corks and 2 holes about a 1/4 inch in from the ends on 264 corks. Warm up your muscles...lol Take your time, take breaks, drink lots of water...lol Wear protective glasses and a dust mask
. If the corks are old and brittle soak them in water for 30 minutes before drilling the holes. You really only need to do this if they are very old. Use a vise to hold the corks if using a hand drill to drill your holes. I have found using a drill press saves time.


Step Four: wire them up
Using a roll of 20 gauge galvanized wire, start lacing the corks directly onto the wire without cutting the wire from the spool. The first row of stringing will be alternating corks starting with a 2 holed cork and then a single holed cork. There will be 23 corks on this row. 12 double holed corks and 11 single holed corks. Double holed corks will be the first and last pieces in this row. This first wired row will actually become the first two rows to start the basket weave. You may need a pair of pliers to pull the wire through each cork. it can make your finger tips sore.

After lacing an entire row, place an eyelet into hole in the end cork to prevent the wire from cutting and slipping through the cork. using needle nosed pliers, make a complete loop a bit larger than the hole in the eyelet.

Then push the entire laced row of corks up against the loop you just made and careful not to let the corks fall off the wire, make a cut with wire cutters using one finger width to measure.

Make another securing loop

The next 21 rows will be made using 12 double holed corks in each row. Each one alternating with the corks from the previous row. Continue until you get to the 23rd row.
The 24th row will be made using corks with one hole in it will tuck right up next to the last row just like rows one and two.
After several hours, sometimes days, weeks, months, you will end up with a completed doormat
You can see above how the end row buts up right against the second row.
Here is a completed custom one I did.

Of course you may want to try something smaller first like a cork trivet.

I sell my cork doormats for $125.00 on etsy in both my shops. sarahracha.etsy.com
sarahrachacorks.etsy.com
Since all the corks I work with are donated to me by friends and wineries the cost to my customers is just my charge for labor. I can also make doormats using your collection of corks. It costs about $10.00 more to ship me your corks. https://www.etsy.com/listing/201000837/custom-recycled-cork-doormat?ref=shop_home_active_9
Sunday, March 20, 2011
Crocheted purse
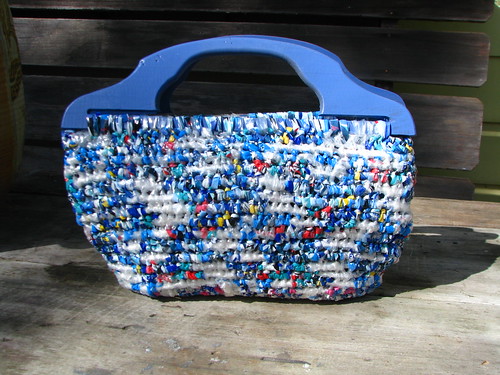
I crocheted this purse using the plastic wrappers from a few cases of paper towels from costco. It has become the purse I use the most. I can easily find my keys or glasses in it. I hate purses because they are black holes. Drives me nuts. I was worried things would spill from this but it seems to stay closed even when it tips over. Going to make another one, once I figure out an inexpensive way to make handles
Thursday, February 3, 2011
Sunday, January 30, 2011
The Kings speech
we finally went to see the kings speech last night. I love movies but hardly ever get to the theater to see them. I do most of my movie watching at home thanks to netflix. I wanted to see the kings speech from the moment I heard Colin Firth and Geoffrey Rush were doing a movie together. Plus I love any movie about British Royalty. This one had a wonderful cast of some of the best actors I have ever seen. When I saw Helen Bonham Carter on the Craig Ferguson show and realized she had been cast as the young Queen mother I knew I just had to go and see it. Who knew I wasn't the only one? By the time we got into the theater all the seats were filled but the first three rows. Colin firth was amazing. His inability to get his thoughts out was painful but my absolutely favorite part was when he finally was to deliver the big war speech, when I heard the first notes of Beethoven's 7th I gasped! It is my favorite symphony. I was so enthralled with the beautiful match of the music to the speech I found myself holding my breath. Whoever thought of adding that piece with his speech is genius. When the last few notes faded off as the kings speech ended I wished I could rewind that scene and watch it again. I can't wait for it to come out on dvd! I will add that scene to my list of perfect scenes.
Friday, January 28, 2011
Organizing
This was an email I wrote this morning to a friend frustrated with not being able to keep organized. liked it so decided to repost it here.
I do love having things neatly put away. I dont know if I have ever had everything in its place for more than a few minutes though. Our tiny 1950's garage is full of shelves and each shelf has containers with all the supplies we need for whatever project we can think of. Everything from staples, ribbon to rubber stamps and fabric. My main problem is My daughter, the art student, self employed Jewelry creator, still living at home NEVER puts the lids back on and most of the time she pulls the containers half off the shelf, or plops them on the work table, removes the lid and sets it where it disappears. She is the type of creative who when she gets an idea she is like a tornado, grabbing bits and pieces from different containers and scattering them as she collects materials. She cant put anything away until she has finished.
Most times she will layer several projects, materials and ideas on the horizontal surfaces of my home before my nagging gets to her and she cleans in a huff! I am really good at finishing projects I start. If I just cant wait to start something new I store the older project in a clear bag. Put it in my bedroom where it will Nag me until I just have to finish it. I sometimes follow a rule that I cant start something new until I finish the project I am working on. I hate it when I do that because my heart will not be in it. I also will put everything away when I am done working at the end of the day. Sure wish my daughter would pick up on that...lol I love figuring out where new items go. Like items with like items. Its like a game.
Sally the frustrated not quite all the way organized mom
--
Sally
sarahracha.etsy.com
Tuesday, January 25, 2011
Basket
I finished another basket last night. This one took me 10 days. I weave my baskets only in the evening after dinner while watching tv. This most recent one I worked on almost every night for an hour or more. I dont keep track of how many hours each one takes but I know it is at least 10 hours. This one I made using a large plastic bag that black sunflower seed bird seed came in. I buy my wild bird seed in bulk and go through about 100 lbs a year. This bag has some very pretty colors in it. Lots of orange, black and yellow. I think when I make these baskets out of the more natural colors they are especially appealing. From a distance you wouldn't think it was made out of a plastic bag. This time I tried putting the plastic through the paper shredder. It didnt cut the plastic but it did perforate it so I had some guide lines to follow while cutting the bag into strips using scissors. It is pretty large. I can see this one sitting on someones coffee table, or as a center piece on a dinning room table. Once again I used dozens of single use plastic bags as the core of this basket,weaving the colored stronger plastic around this core by wrapping it in the coil method. I use a needle to poke the strips through the previous row of coils and pull it tight. To make the plastic bag rope core I use as the inside coil, I take dozens of single use plastic shopping bags, cut off the handles and cut off the bottom seam on the plastic bag. I save the strip from the bottom. I then take the loop of plastic that was the bag, open it up and using the cut off seam I tie these loops together. I have found that this makes the most consistent thickness for the core rope. I have tried many many other methods, looping them together like a rubber band, taping them end to end with scotch tape all of which made lumps at the connection. I do love the baskets I made that have these inconsistencies in them because they dont look like mass produced plastic Easter baskets which other people who make recycled plastic bag baskets seem to favor. It is easier to weave if the core is consistent. I want mine to look natural, primitive. The juxtaposition between an ancient craft humans all over the world throughout time have used and a non natural Plastic which humans will have to learn to live with due to it never decomposing makes for a fascinating object. I will take some photos today and add them after I have my coffee.

Thursday, January 13, 2011
New year
This last month has been real busy. I have had more sales in my etsy shop than any other one month period. My recycled cork objects and my recycled plastic baskets have been real popular. This sweet heart trivet has been the number one seller. I really love this one.

I sold the first recycled plastic bag basket I ever made. I have sold many others but this first one just sat there. It is made out of plastic bags from the Legion Of Honor/ De Young Museum shop bags which are stripped orange, turquoise and green bags. Bright colors but such an adorable basket. I will miss seeing it waiting on my shelf and sure hope it is happy in its new home.

I am having a sale on my scarves. I marked them all down 50% and would love to get them around some cold necks this winter. I toy with the idea of keeping them for myself but really I have to admit I have a scarf addiction. How many scarves can one woman living in a pretty mild climate truly need to own? Check them out and see if there is one you would like to help keep you warm this winter.
I wish you all the best 2011! lets hope it is a good one.
Friday, January 7, 2011
Thursday, January 6, 2011
Tuesday, January 4, 2011
Subscribe to:
Posts (Atom)